
This Cherry Cheesecake Recipe is a classic treat that blends creamy cheesecake with the sweet, tangy taste of cherries. Its vibrant red topping over a smooth white filling makes it a showstopper. Designed for both beginners and experienced bakers, this foolproof recipe guides you through every step, from the buttery crust to the luscious topping. Follow along to create a stunning and delicious dessert everyone will love!
Table of Contents
Ingredients for Homemade Cherry Cheesecake
To create this masterpiece, you’ll need three main components: the crust, the filling, and the cherry topping. Additionally, gathering all the ingredients beforehand will make the process smoother.
Ingredients for the Perfect Cheesecake Crust
Learn how to create a graham cracker crust that complements this cherry cheesecake recipe beautifully.
- Graham crackers: 1 ½ cups, crushed into fine crumbs (about 12 full crackers). You can also use digestive biscuits or Oreo cookies for variations.
- Granulated sugar: 2 tablespoons for a hint of sweetness.
- Unsalted butter: 6 tablespoons melted, to bind the crumbs together.
Optional: Add a pinch of cinnamon or a dash of vanilla extract to the crust for extra flavor.
Cheesecake Filling Ingredients for a Creamy Texture
This section details the ingredients needed to achieve the rich, creamy filling in this cherry cheesecake recipe.
- Cream cheese: 24 ounces (3 packages), softened to room temperature. Full-fat cream cheese works best for the creamier texture.
- Granulated sugar: 1 cup, to sweeten the filling.
- Sour cream: ¾ cup, for tanginess and creaminess.
- Vanilla extract: 1 teaspoon, for flavor.
- Eggs: 3 large, at room temperature, to give structure to the cheesecake.
Optional: A tablespoon of lemon juice or zest can add a refreshing citrus note.
Sweet Cherry Topping Ingredients
The crowning glory of this dessert is the cherry topping, which should be vibrant, flavorful, and slightly thickened.
- Fresh or frozen cherries: 2 cups, pitted and halves. Canned cherry pie filling is a convenient alternative.
- Granulated sugar: ½ cup, to balance tartness.
- Cornstarch: 1 tablespoon to thicken the topping.
- Water: ¼ cup, to help dissolve the cornstarch.
- Lemon juice: 1 teaspoon, to enhance the cherry flavor.
Optional: A splash of almond extract can give a subtle, nutty undertone.
Tools for Making Your Cherry Cheesecake Recipe
Find out which tools and equipment will help you bake this easy cherry cheesecake recipe with professional-quality results.
- Springform pan (9-inch): Essential for easy removal of the cheesecake.
- Mixing bowls: at least three for the crust, filling, and topping.
- Electric mixer: A stand or handheld mixer for whipping the cream cheese filling.
- Food processor: To crush Graham crackers quickly.
- Spatula: For scraping down the sides of the bowl.
- Saucepan: For cooking the cherry topping.
- Cooling rack: To cool the cheesecake evenly.
- Roasting pan: Optional but useful for creating a water bath to prevent cracks.
Having the right tools not only simplifies the process but also ensures professional-quality results.
Step-by-Step Instructions for Easy Cherry Cheesecake
With your ingredients and tools ready, it’s time to start crafting your Cherry Cheesecake Recipe. Follow these detailed steps for each component crust, filling, and topping to achieve a flawless dessert.
How to Prepare the Cheesecake Crust
Follow these simple steps to make the buttery crust that forms the base of this cherry cheesecake recipe.
- Crush the Graham Crackers:
Use a food processor or place the crackers in a sealed plastic bag and crush them with a rolling pin until fine crumbs form. - Mix the ingredients:
In a bowl, combine the Graham cracker crumbs, granulated sugar, and melted butter. Stir until the mixture resembles wet sand. - Press into the pan:
Transfer the mixture into a 9-inch springform pan. Use the bottom of a measuring cup to press the crumbs firmly and evenly across the base.
Tip: Push some crumbs slightly up the sides for added texture and stability. - Prebake the crust:
Preheat the oven to 350°F (175°C). Bake the crust for 8-10 minutes to set it. Remove from the oven and let it cool while you prepare the filling.
Optional: Skip prebaking for a no-bake version, but ensure the crust is firmly pressed.
Mixing the Cheesecake Filling for Your Recipe
Learn the best techniques for mixing ingredients to achieve the smoothest, creamiest filling for your cherry cheesecake.
- Beat the Cream Cheese:
In a large mixing bowl, use an electric mixer to beat the cream cheese until smooth and creamy, about 2-3 minutes.
Tip: Scrape down the sides of the bowl to prevent lumps. - Add sugar and sour cream.
Gradually mix in the granulated sugar until fully incorporated. Then, add sour cream and vanilla extract, blending until smooth. - Incorporate the eggs:
Add the eggs one at a time, mixing on low speed after each addition. Avoid overmixing, as it can incorporate too much air and cause cracking during baking. - Check the consistency:
The filling should be thick, smooth, and creamy. If there are lumps, gently mix until they dissolve.
Preparing the Cherry Topping
- Cook the Cherries:
In a medium saucepan, combine cherries, granulated sugar, and lemon juice over medium heat. Stir occasionally until the cherries release their juices, about 5-7 minutes. - Thicken the mixture:
In a small bowl, mix cornstarch with water until dissolved. Gradually pour this slurry into the cherry mixture, stirring continuously. Cook until the topping thickens and coats the back of a spoon. - Cool the Topping:
Remove the pan from heat and let the topping cool to room temperature. For a smoother texture, you can strain out the cherry pieces or leave them for added texture.
Baking and Assembling Your Cherry Cheesecake Recipe
Now that each component is prepared, it’s time to assemble and bake the cheesecake to perfection.
Assembling the Layers for Homemade Cherry Cheesecake
Discover how to assemble the crust, filling, and topping to create a beautifully layered cheesecake.
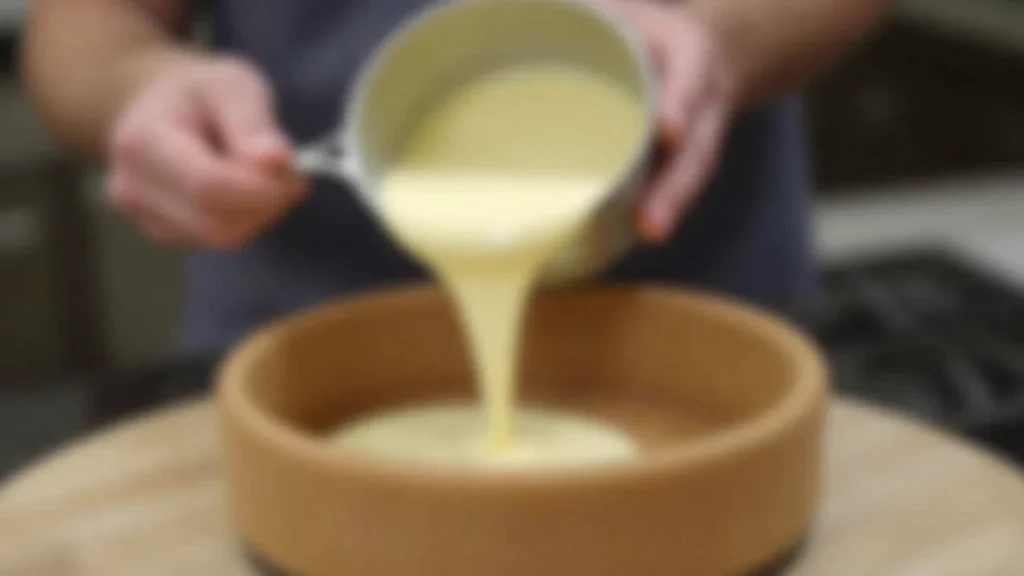
- Pour the filling over the crust.
Carefully pour the cheesecake filling into the springform pan over the baked crust. Use a spatula to smooth the top.
Tip: Tap the pan gently on the counter to release any air bubbles. - Optional Water Bath:
Wrap the bottom of the springform pan with aluminum foil and place it in a larger roasting pan. Fill the roasting pan with 1-2 inches of hot water. This prevents cracks by keeping the baking environment moist.
Baking Tips for a Crack-Free Cherry Cheesecake
This guide includes expert advice on baking your cheesecake perfectly every time.
- Bake at a Low Temperature:
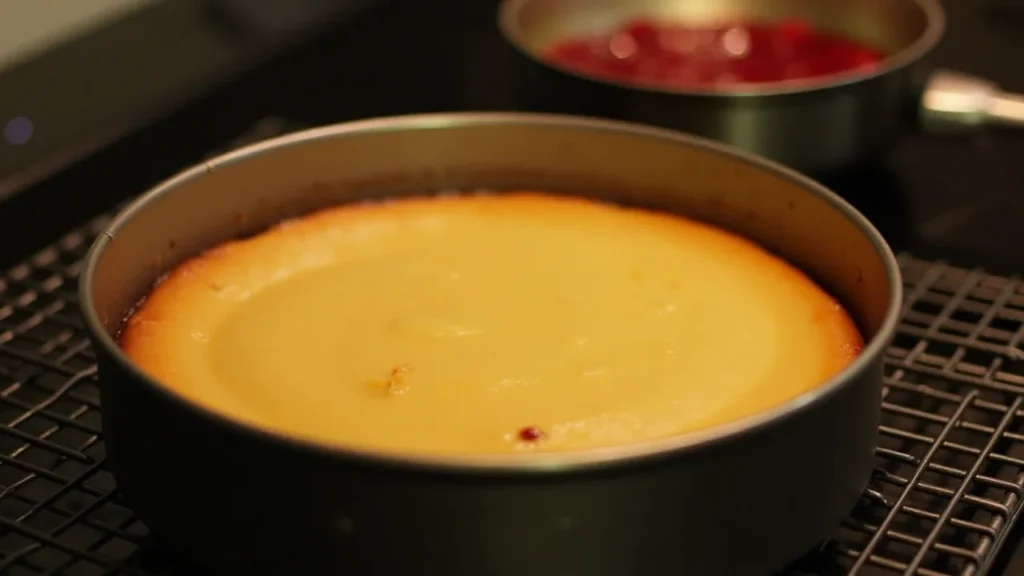
Preheat the oven to 325°F (165°C). Bake the cheesecake for 55-65 minutes or until the edges are set, but the center still jiggles slightly when the pan is shaken. - Cool in the Oven:
Turn off the oven and prop the door open slightly. Let the cheesecake cool in the oven for 1 hour to prevent sudden temperature changes that can cause cracking.
Cooling and Setting the Cheesecake
- Refrigerate:
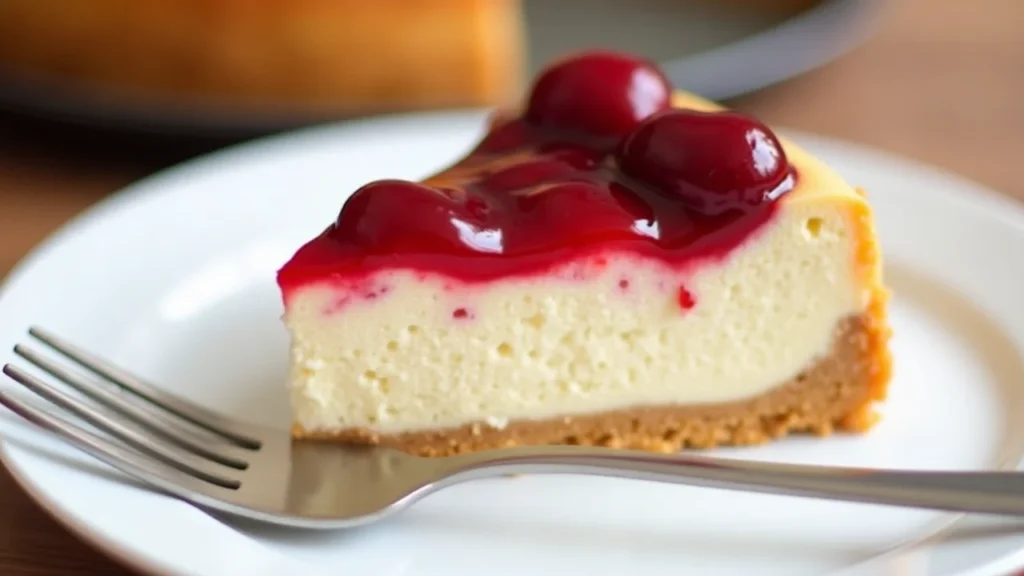
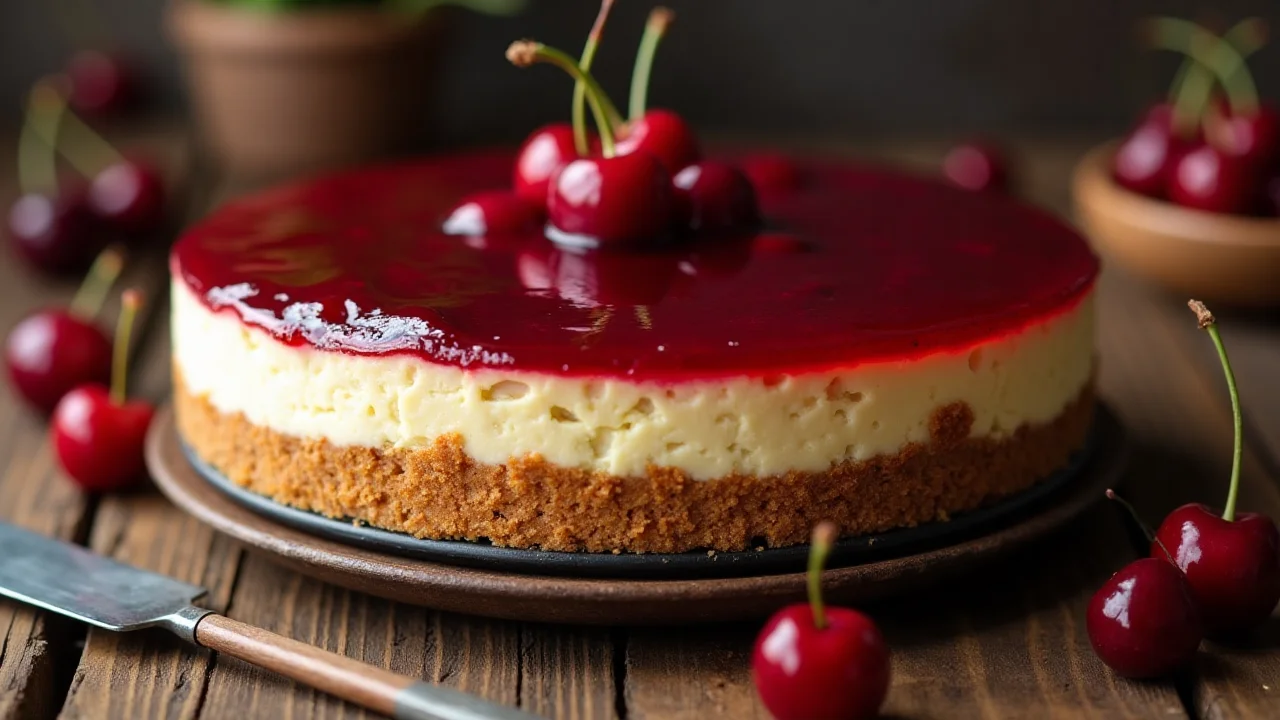
Transfer the cheesecake to a cooling rack and let it reach room temperature. Then cover it with plastic wrap and refrigerate for at least 4-6 hours, preferably overnight. - Add the cherry topping:
Once the cheesecake has fully set, spread the prepared cherry topping evenly over the top. You can add as much or as little topping as desired. - Final Touches:
Garnish with whipped cream, chocolate shavings, or fresh mint leaves for an extra layer of elegance.
Tips for the Perfect Cherry Cheesecake Recipe
Making the perfect cherry cheesecake can be easy if you follow some expert tips and avoid common pitfalls. These recommendations will help ensure your cheesecake is as delicious and visually stunning as possible.
Common Mistakes to Avoid
When making Cherry Cheesecake Recipe, certain mistakes can affect the outcome. However, with a little attention to detail, you can avoid these pitfalls and bake a dessert that looks and tastes amazing.
Overmixing the Batter
First and foremost, avoid overmixing the batter. Overmixing can introduce too much air, which often causes the cheesecake to puff up while baking and then collapse or crack as it cools. To prevent this, mix only until the ingredients are just combined. Moreover, using a low speed on your mixer can help minimize air incorporation.
Using Cold Ingredients
Another common mistake is using ingredients straight from the fridge. For instance, cream cheese, eggs, and sour cream should always be at room temperature before mixing. This is because cold ingredients can result in a lumpy batter, making it harder to achieve a smooth texture. Therefore, it’s essential to let them sit out for at least 30 minutes beforehand. As a bonus, room-temperature ingredients blend more easily, saving you time and effort.
Skipping the Water Bath
In addition, many bakers skip the water bath, thinking it’s optional. However, this step is critical because it creates a humid environment in the oven, which helps prevent the cheesecake from drying out or cracking. If you choose not to use a water bath, you should at least place a pan of hot water on a lower rack. This alternative method, while not as effective, still adds moisture to the oven. Furthermore, closely monitoring the cheesecake during baking can help you avoid overcooking.
Opening the Oven Door Too Early
Finally, resist the temptation to open the oven door before the cheesecake is set. While it’s natural to want to check on your progress, doing so can cause a sudden drop in temperature, which often leads to cracks or uneven baking. Instead, rely on the timer and wait until the baking time is almost up. Afterward, gently check the cheesecake by giving the pan a slight shake; the center should jiggle slightly while the edges appear set.
How to Prevent Cracks in Cheesecake
- Prepare the pan Properly:
Always grease the sides of the springform pan lightly to prevent the cheesecake from sticking as it cools and shrinks. - Bake Slowly at Low Heat:
Cheesecake requires a gentle baking process. A lower temperature ensures even cooking without overcooking the edges. - Cool Gradually:
Sudden changes in temperature can shock the cheesecake and cause it to crack. Let the cheesecake cool in the oven with the door slightly open before transferring it to a cooling rack.
Customization Ideas
- Chocolate Drizzle:
Add melted chocolate to the top of the cherry layer for a decadent twist. - Nutty Crusts:
Substitute some of the Graham crackers with ground nuts, such as almonds or pecans, for added flavor and crunch. - Flavored Cheesecake Layers:
Incorporate a layer of chocolate or caramel between the crust and filling for extra richness. - Cherry Variations:
Use maraschino cherries, black cherries, or even a mix of berries for the topping to change up the flavor profile.
Storage and Serving Suggestions
Proper storage and serving techniques can elevate your Cherry Cheesecake Recipe experience and ensure it stays fresh and flavorful.
Best Practices for Storing Cheesecake
- Refrigeration:
After the cheesecake has set, store it in the refrigerator covered with plastic wrap or aluminum foil. It will stay fresh for up to 5-7 days. - Freezing:
If you want to store it longer, freeze the cheesecake. Wrap it tightly in plastic wrap and a layer of foil before placing it in a freezer-safe bag. It can be frozen for up to 3 months. Thaw overnight in the refrigerator before serving. - Individual Slices:
For easier serving, slice the cheesecake before freezing. Place parchment paper between slices to prevent them from sticking.
Serving Tips
- Perfect Slices:
To get clean slices, dip a sharp knife in warm water, wipe it dry, and cut. Repeat between slices for neat presentation. - Pairings:
Serve your cheesecake with coffee, tea, or a dessert wine. You can also add whipped cream or vanilla ice cream on the side. - Room Temperature:
Let the cheesecake sit at room temperature for 15-20 minutes before serving to bring out its full flavor.
More Recipes to Try
Explore other delicious options on Cooked Joy:
- For a moist and nutty dessert, try this Almond Cake Recipe.
- Need a quick and unique dessert? Check out the Dubai Chocolate Bar Recipe.
- Interested in easy homemade desserts? Don’t miss the Nestle Cookie Recipe.
FAQs About Cherry Cheesecake Recipes
To help you succeed with this recipe, here are answers to some common questions. These tips will ensure your Cherry Cheesecake Recipe turns out just right.
Can I Use Canned Cherries in This Cheesecake Recipe?
Yes, you can use frozen cherries! In fact, they are a fantastic option when fresh cherries are out of season. First, make sure to thaw them completely and drain the extra liquid. This step is important because it prevents the topping from becoming too runny. If the cherries are already sweetened, you may need to reduce the amount of sugar in the recipe.
How long does Cherry Cheesecake Recipe stay fresh?
Cherry Cheesecake Recipe can stay fresh for several days if stored properly. Typically, it will last 5-7 days in the fridge. Be sure to cover it tightly to keep the flavors intact and avoid it absorbing odors from other foods. For longer storage, you can freeze it. When freezing, wrap the cheesecake in plastic wrap and aluminum foil. Then, thaw it overnight in the fridge before serving.
What can I use instead of cream cheese?
If you don’t have cream cheese, don’t worry there are substitutes! Mascarpone cheese or ricotta cheese work well because they are also creamy and rich. Another option is to mix Greek yogurt with heavy cream, which creates a similar texture. However, keep in mind that the flavor might be slightly different.
Can I make this recipe gluten-free?
Yes, you can absolutely make this cheesecake gluten-free. Simply use gluten-free graham crackers or cookies for the crust. Also, double-check other ingredients, such as cornstarch and vanilla extract, to ensure they are certified gluten-free. This way, you can enjoy the cheesecake without any worries.
Why does my cheesecake crack?
Cracks in a cheesecake can happen for a few reasons, but they are easy to avoid with the right steps. First, overmixing the batter can introduce too much air, which can lead to cracks as the cheesecake bakes. Next, sudden temperature changes like cooling the cheesecake too quickly can cause cracking as well. Finally, skipping a water bath may make the surface dry out. For best results, follow the tips in this recipe to keep your cheesecake smooth and beautiful.
Do I have to use a water bath?
While a water bath isn’t absolutely required, it is strongly recommended. A water bath helps create a moist baking environment, which keeps the cheesecake from drying out or cracking. If you prefer not to use a water bath, you can still add moisture by placing a pan of hot water on the bottom oven rack. This alternative method works well and is easier for some bakers.
Conclusion: Try This Cherry Cheesecake Recipe Today
Cherry Cheesecake Recipe is a wonderful dessert that combines a crunchy crust, a creamy filling, and a sweet, fruity topping. It’s a treat that feels luxurious but is surprisingly easy to make. By following this step-by-step recipe, you can bake a cheesecake that is not only delicious but also visually stunning.
Therefore, it’s time to gather your ingredients and get started! Enjoy the process of creating something special, and don’t forget to share it with your friends and family. After all, desserts like this are meant to be enjoyed together. Happy baking!
Best Cherry Cheesecake Recipe
Equipment
- 9-inch springform pan (for easy release and a professional look)
- Mixing bowls (various sizes for crust and filling)
- Electric mixer or stand mixer (to achieve a smooth, lump-free batter)
- Measuring cups and spoons (for accuracy)
- Rubber spatula (for scraping down the sides)
- Oven (preheated as required)
- Cooling rack (to allow gradual cooling)
- Saucepan (for warming and thickening the cherry topping)
- Fine-mesh strainer (optional) (if you prefer a smoother topping)
Ingredients
- For the Crust
- 1 ½ cups graham cracker crumbs about 16 whole crackers, crushed finely
- ⅓ cup granulated sugar
- ½ cup unsalted butter melted
- For the Cheesecake Filling
- 4 8-ounce packages cream cheese, softened (total 32 oz)
- 1 ¼ cups granulated sugar
- 2 tablespoons all-purpose flour
- 4 large eggs at room temperature
- ½ cup sour cream for extra creaminess
- ¼ cup heavy cream to enrich the filling
- 1 teaspoon vanilla extract
- 1 tablespoon lemon juice optional, for a hint of tang
- For the Cherry Topping
- 1 can 21 oz cherry pie filling
- or for a fresher option:
- 2 cups pitted fresh or frozen cherries
- ⅓ cup cherry preserves
- 1 tablespoon cornstarch mixed with 1 tablespoon water optional, if a thicker topping is desired
Instructions
- Prepare the Crust:
- Preheat the Oven: Set your oven to 350°F (175°C).
- Mix Ingredients: In a medium bowl, combine the graham cracker crumbs, granulated sugar, and melted butter. Stir until the crumbs are evenly moistened.
- Form the Base: Press the mixture firmly and evenly into the bottom of a 9-inch springform pan.
- Bake: Place in the oven and bake for 10 minutes. Remove and let cool while you prepare the filling.
- Prepare the Filling:
- Lower Oven Temperature: Reduce the oven temperature to 325°F (163°C).
- Beat Cream Cheese: In a large mixing bowl, beat the softened cream cheese and 1 ¼ cups sugar on medium speed until smooth and creamy.
- Add Eggs: Incorporate the eggs one at a time, beating after each addition to ensure full incorporation.
- Mix Remaining Ingredients: Add sour cream, heavy cream, vanilla extract, flour, and lemon juice (if using). Beat on low speed until the batter is smooth and homogeneous.
- Assemble: Pour the cheesecake batter over the pre-baked crust. Gently tap the pan on the counter to release any trapped air bubbles.
- Bake the Cheesecake:
- Baking: Place the pan in the preheated oven and bake for 55–65 minutes. The edges should be set, and the center should be just slightly jiggly.
- Cool Gradually: Turn off the oven and crack the door open. Let the cheesecake cool in the oven for about 1 hour to prevent sudden temperature changes that could lead to cracks.
- Chill: Transfer the cheesecake to the refrigerator and chill for at least 4 hours (overnight is best) to fully set.
- Prepare the Cherry Topping:
- Heat Topping: In a small saucepan, gently warm the cherry pie filling over medium heat.
- If using fresh cherries and preserves: Combine them in the saucepan and heat until the mixture begins to bubble.
- Thicken (Optional): For a thicker topping, stir in the cornstarch slurry and cook for an additional 2–3 minutes, until slightly thickened.
- Cool: Remove from heat and allow the topping to cool completely.
- Serve:
- Top the Cheesecake: Spread the cooled cherry topping evenly over the chilled cheesecake, or serve it on the side if preferred.
- Slice & Enjoy: Carefully remove the sides of the springform pan, slice the cheesecake, and savor each creamy, fruity bite.
- Details
- Prep Time: Approximately 30 minutes
- (Includes measuring, mixing, and crust preparation)
- Cook Time: About 1 hour 15 minutes
- (10 minutes for the crust + 55–65 minutes for the cheesecake)
- Total Time: Approximately 6–8 hours
- (Including baking, gradual cooling, and at least 4 hours of chilling)
- Yield: 12 servings
- Category: Dessert
- Method: Baking
- Cuisine: American
- Diet: Vegetarian
- (Can be adapted to gluten-free by using gluten-free graham crackers)
- Keywords
- Cherry Cheesecake, Best Cheesecake, Cream Cheese Dessert, Graham Cracker Crust, Cherry Pie Topping, Party Dessert, Indulgent Treat, American Cheesecake
- Nutrition (Per Serving – Approximate Estimates)
- Serving Size: 1 slice (approximately 1/12th of the cheesecake; ~125 g)
- Calories: 450 kcal
- Sugar: 30 g
- Sodium: 350 mg
- Fat: 30 g
- Saturated Fat: 18 g
- Unsaturated Fat: 10 g
- Trans Fat: 0 g (negligible)
- Carbohydrates: 35 g
- Fiber: 1 g
- Protein: 7 g
- Cholesterol: 120 mg
- Note: Nutritional values are estimated and can vary based on the specific brands and types of ingredients used.
Notes
Avoid Overmixing: Mix the batter gently, especially after adding eggs, to minimize air incorporation that could cause cracks.
Prevent Cracking: Allow the cheesecake to cool gradually (using the oven’s residual heat) before refrigerating.
Gluten-Free Adaptation: Substitute traditional graham crackers with a gluten-free alternative if needed.
Baking Time Variation: Oven temperatures can vary; the center should remain slightly jiggly when done.
Storage: Keep leftovers in an airtight container in the refrigerator for up to 5 days. This cheesecake also freezes well—wrap tightly and freeze for up to 2 months (thaw in the refrigerator overnight).